5 DIY Tumblr Inspired School Supplies

Welcome Back, guys!
I just realize that I haven't doing another post about DIY for about a month now tbh I get a lot of reader when I post about my first DIY than when I post about another things on my blog. So if you want to check my first post about DIY you can read it by click here 5 Simple DIY for Your Room Decor
I promise that you will like it^^
But for this DIY post it won't be the same as the first one, my first post is about a room decor and for this second post it will be about school supplies but it's not just an ordinary school supplies it's "tumblr inspired", and as always you don't need to worry about how hard the DIY would be, because I will always keep my DIY simple and easy so you guys can make it. I choose to make a post about DIY school supplies is because I get bored easily with my plain school supplies. So without further adieu let's get into it.


  1.  Clipboards Make-over

    Have you feel bored about the look of your plain and boring clipboard? Well I do. I 
 wanted my clipboards to look more colorful, so when I came across this DIY I decided to share it with you guys. 


clipboard-makeover
 You will need:
  • A duct-tape (make sure to pick /buy the colorful ones/with a pattern)

  • craft knife
  • a ruler
  • Tips: If you have a problem choosing what kind of duct-tape that you need to buy, I suggest you to buy duct-tape that had a brand name "scotch" you can buy it at the bookstore.


    How To Make It:
    • You will need a duct-tape and a craft knife.

  • Like in the picture you can cut your duct-tape into any shape like triangle, round, square, or any kind of shape you like.
  • When you cut your duct-tape you have to used ruler to make it more nice.

  • clipboard make over
    Or you can use that kind of ruler to make it easier for you to cut the duct-tape.

    clipboard make over

     you can also make this kind of design.
     Tips: Also if you make any design mistake (like placing the duct-tape on a wrong spot) you can always lift the tape using your craft knife.


        2.  Handmade Cute Bookmark
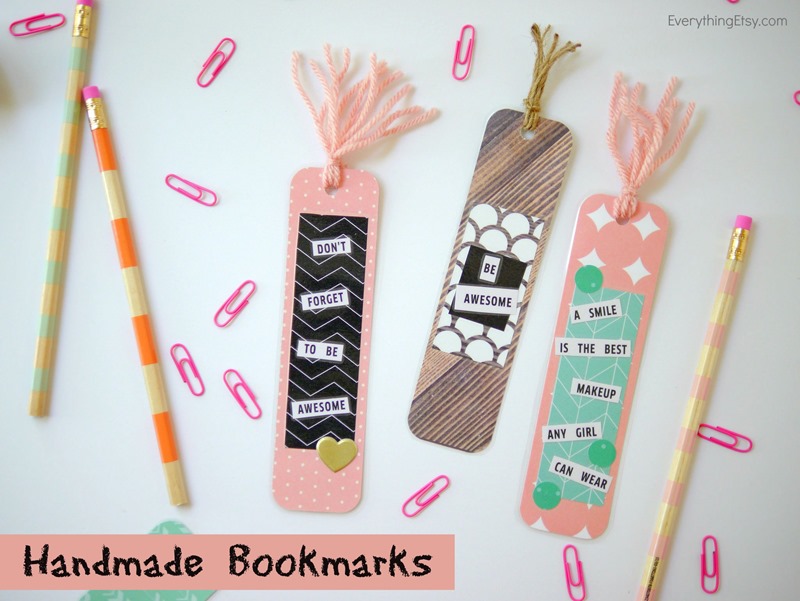
     This DIY is so adorable, and you can make a bunch of them.


    Handmade Bookmarks -

    What Will You Need:
    •  a cute pattern paper

  • sticker
  • scissors
  • glue stick
  • corner punch/hole punch
  • yarn or twine


  • Making bookmarks - everythingetsy.com


     How To Make:
    • As you can see on the picture.

  • First you need to cut your paper 
  • Cut the corner of the paper (if you don't have corner punch you can use your regular scissors)make the corner into a round corner.
  • Then use your hole punch to make a hole at the top of your paper.
  • Then you can design your bookmark (like adding a sticker, or another paper)

  • Back-to-School Bookmarks DIY -

    •  You can make the design like in the picture. 


  • At the picture you can see that you can also laminate your bookmark to make it last longer. If you do laminate your bookmark then you wanted to add a sticker on you bookmark it's better to add the sticker after you finish laminate your bookmark.


  • Then after you finish with all the design you can tie the twine or yarn together at the top of your bookmark.


  •     3. Rainbow Watercolor Bag-pack

    This DIY will turn your plain white backpack into a colorful backpack.


    backpack

     You Will Need:
    • A plain white backpack
    • A marker(fabric marker)
    • spray bottle filled with water


    backpack


     How To Make It:
    • Just scribble your fabric marker to your backpack.
    • Then spray it with you spray.


    backpack

    And here's the final result:


    backpack


        4.  Heart Shaped Paper Clip

     This project is for a lazy people, cause this just so..simple.


    heart

     I will not write the step by step for this DIY I will show you the picture instead:


    heart


    Tips: If you don't have a pink paper clip you can just spray paint it.


        5. Pink Eraser USB 


    Picture of Pink Eraser USB Flash Drive

    Have you wondering how to make this cute and unique flash-disk drive? Want to make it? Here's how to make it.

    You Will Need:
    •  Eraser

  • Flash-disk


  • knife

  •  How about I give you the picture for the step by step, because I think it will be easier to understand^^


    Picture of Cut the erasers

    • Cut the eraser using knife.

    Picture of Free up the flash drive
    •  Get rid the plastic case.

     Picture of Hollow out the pieces
    •  Dig up your eraser until the flash-disk fit into the eraser.
    IMG_0417.jpg
    •  Then it's done.


    That's all about today post.
    Hope you guys like it and hope this post will keep you inspire.
    Don't forget you can always be notify when I upload a anew post by clicking the "follow button" or you can also enter your e-mail when the pop up menu appeared on my blog^^
    Btw I always update my blog every Monday & Saturday.
    If you like this blog, why don't you help me by sharing this post on your social media? I will really appreciated it^^
    Also you can always give me your suggestion about my next post on the comment section.


     Thank You For Reading My Blog,

    Have a Fantastic Day!


    CONVERSATION

    0 comments:

    Post a Comment

    Back
    to top